
Fix a Printer Printing Faded Pages in 5 Minutes Without Wasting Ink

Faded prints almost always come down to one of three things: low ink or toner, clogged printhead nozzles, or a driver stuck on a draft or toner-save setting. Before you touch anything else, check your consumable levels on the printer panel and run a print quality check or nozzle test. That single test tells you whether you’re chasing an ink problem, a hardware fault, or a settings mix-up.
TL;DR:
Most faded prints stem from low ink or toner, clogged nozzles, or incorrect driver settings such as draft or toner save mode.
Running a print quality check page helps identify whether the issue is hardware blockage, low consumables, or settings misconfiguration.
Cleaning cycles, cartridge reseating, or replacing cartridges can fix most inkjet-related fading, but mechanical failures like damaged printheads require professional repair.
Laser printers often fade due to depleted toner, worn drums, or low-density settings, with replacing toner or drum units being necessary in persistent cases.
Proper prevention includes regular testing, using correct paper types, storing cartridges properly, and adjusting driver settings to avoid avoidable fading issues.
Table of Contents
Printer printing faded? Run this five-minute check first
Most faded printing issues can be resolved by following a simple troubleshooting sequence that rules out common settings and consumable problems before advanced repair or replacement.
Check ink or toner status. Open the printer’s control panel menu or the driver software on your computer and look at the consumable levels. Low ink or toner is a very common reason for washed-out output, and it’s the first thing manufacturer support pages tell you to check.
Print a print quality check page. Every major printer brand has a built-in nozzle check or PQCS (print quality check sheet) function, usually buried in the maintenance or tools menu. Print it and look closely at the pattern.
Check your print settings. Open the driver dialogue and confirm you’re not printing in draft mode or with toner save/ink save switched on. Also check the media type setting actually matches the paper in the tray.
Run one cleaning cycle, then reprint the test page. Don’t run three or four in a row. One cycle, then check the result.
Inspect the cartridges themselves. Pop them out, check for leftover protective tape over the print head or contacts, and reseat them firmly.
Pro Tip: Write down what the nozzle check pattern looks like before you clean anything. If cleaning doesn’t fix it, that “before” pattern is exactly what a technician will want to see to diagnose the fault fast, saving you a second visit.
Running through this list takes about five minutes and costs nothing except a sheet of paper and a small amount of ink or toner. Most people find their answer somewhere in steps 1 to 3.
How do I read a print quality or nozzle check?
A nozzle check page turns a vague symptom like “faded printing” into a specific, readable diagnosis. It’s the single most useful five minutes you’ll spend on this problem, and manufacturer support material treats it as the mandatory first step before assuming anything is broken, as Microsoft’s own printer troubleshooting guidance makes clear.
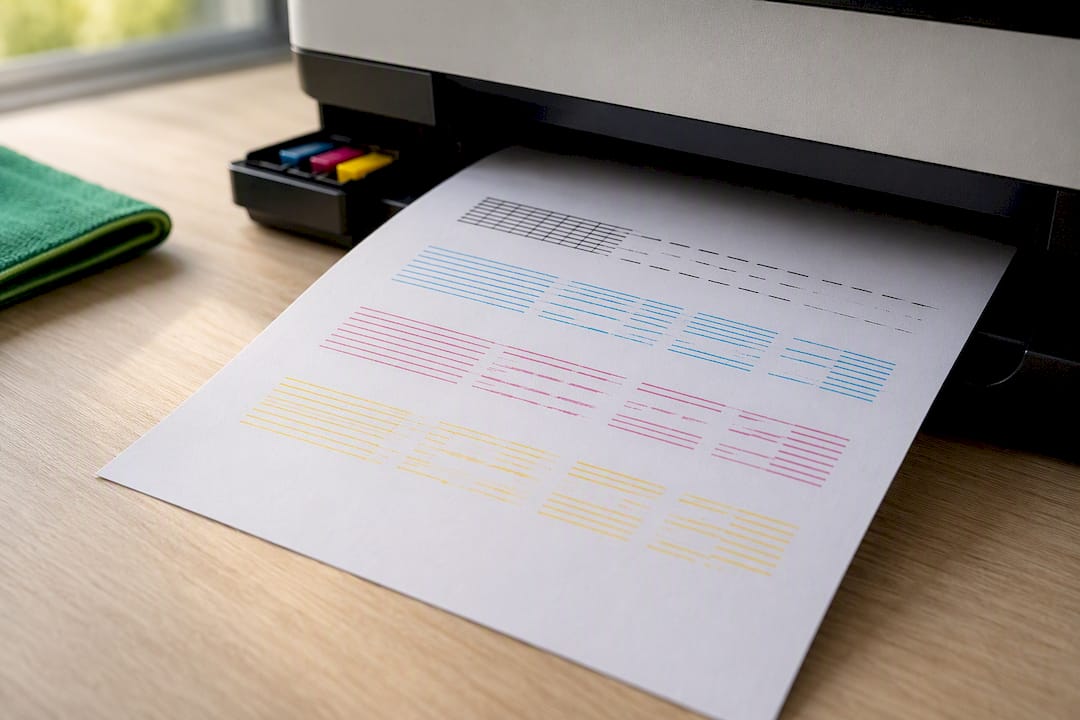
You can trigger this test two ways. From the printer itself, look in the settings or maintenance menu for “Print Quality Check,” “Nozzle Check,” or similar wording, usually accessed via the printer’s touchscreen or a button combination if it’s an older model without a screen. From your computer, open the printer properties in Windows or the printer utility in macOS, find the “Maintenance” or “Utilities” tab, and select the diagnostic print option.
Here’s how to read what comes out:
Missing lines or gaps in the pattern point to blocked nozzles. This is the classic inkjet fault and it’s fixable with cleaning cycles in most cases.
Faded or grey-toned solid blocks on a laser machine usually mean toner is genuinely low, or a density/economy setting is dialling everything back.
Horizontal banding or repeating light streaks at regular intervals often point to a drum or roller problem rather than an ink issue, particularly on laser printers.
One colour missing entirely while others print fine narrows the fault to a single cartridge or a single nozzle row, which is useful information if you end up calling a technician.
Brother’s own support documentation confirms this reading: gaps or missing segments on the check sheet indicate blocked nozzles that need a cleaning cycle, or an Initial Purge if standard cleaning doesn’t clear it.
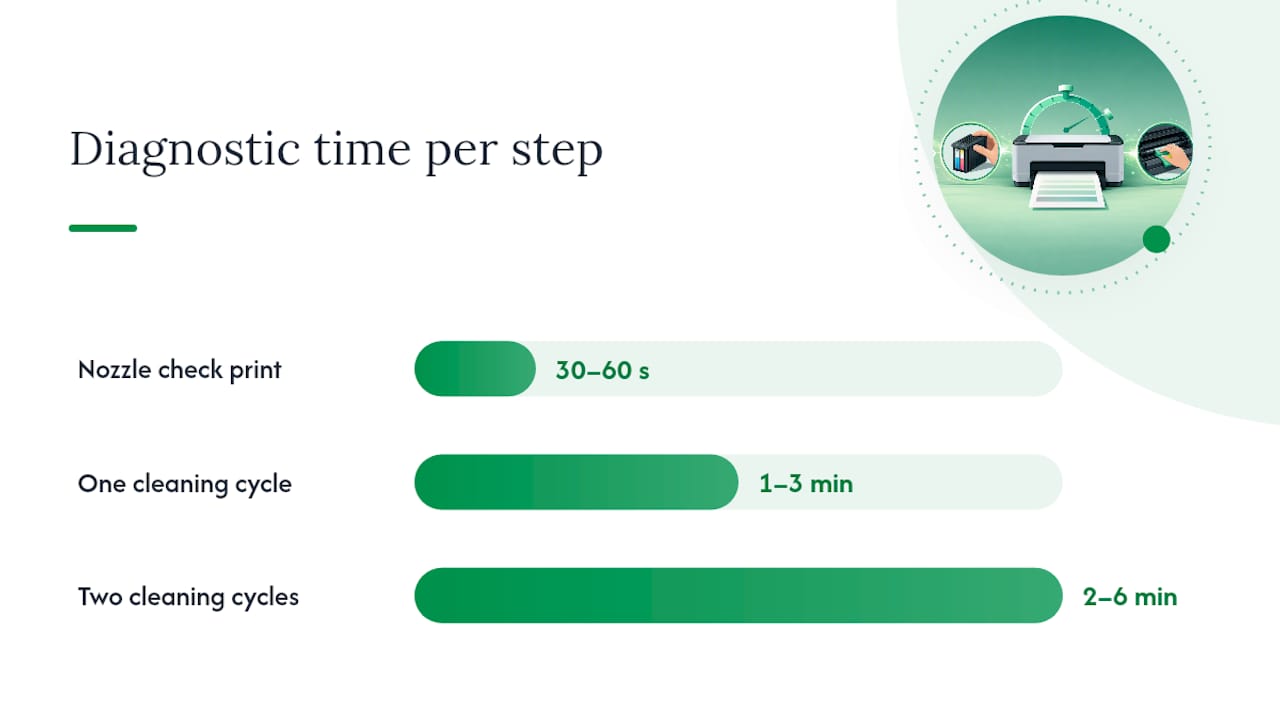
The diagnostic print itself takes 30 to 60 seconds. A standard cleaning cycle afterwards runs another one to three minutes depending on the model. Here’s the catch worth knowing before you start: automated cleaning cycles use a genuinely surprising amount of ink each time they run, because the printer is flushing ink through the nozzles to clear blockages, not laying it on paper. Run one, check the result, and only run a second if the pattern actually improved. If two cleaning cycles haven’t shifted the problem, cleaning isn’t the fix and you need to look at cartridges, settings, or hardware instead.
Fixing faded inkjet prints without wasting ink
Inkjet printers respond well to a staged approach: start with the cheapest, least invasive fix and only escalate if it fails. Jumping straight to manual disassembly when a $0.02 cleaning cycle might have solved it is a waste of time and risk.
Run one automated cleaning cycle, then print the check page again. If the pattern improves but isn’t perfect, run it once more. Two cycles is the practical ceiling; a third rarely helps and just burns ink.
If cleaning doesn’t shift it, try an Initial Purge. Most inkjet printers offer this as a more aggressive option in the maintenance menu when standard cleaning fails. HP’s own support documentation walks through this exact escalation: print the diagnostic page, clean, then purge if the fault persists. Be warned, a purge uses noticeably more ink than a standard clean, so don’t run it repeatedly hoping for a different result.
Swap in a fresh, genuine cartridge before going further. This single step rules out a huge category of faults. If a new cartridge fixes the fading immediately, you’ve saved yourself an afternoon of manual cleaning for nothing.
If the cartridge is fine but fading persists, consider a manual printhead soak. Remove the cartridge or printhead assembly according to your model’s instructions, and soak the nozzle plate in warm distilled water for 15 to 30 minutes to dissolve dried ink. Blot the plate gently with lint-free paper afterwards and let it air dry fully before reinstalling. Don’t rush this step. Reinstalling before the head is completely dry can cause streaking or even short out the cartridge’s electrical contacts.
Know when to stop. If none of the above works, you’re likely looking at a cracked nozzle plate or physically damaged printhead. No amount of soaking or purging fixes a genuine mechanical fault.
Pro Tip: If your printer’s nozzle check shows two or more colours affected at once, most manufacturers recommend purging all channels together. If only black is patchy and the colours print fine, purge black alone. Following the device’s own prompt rather than blasting every colour saves ink you didn’t need to waste.
That last point matters more than it sounds. A lot of people run a full-colour purge because they assume “more thorough” means “more effective,” when the printer is already telling them exactly which channel needs attention.
Worth noting: on cheaper consumer inkjets, a damaged printhead often costs close to what a new printer costs. At that point, replacing the whole unit can be more sensible than chasing a repair, particularly if the machine is already a few years old. On mid-range and higher-end models with separately replaceable printheads, swapping just the head is usually worthwhile and considerably cheaper than a full unit.
Why does my laser printer print faded or patchy toner?
Laser printers fade for different reasons than inkjets, and the fixes don’t involve soaking anything in water. The three usual suspects are toner running low, an economy setting quietly reducing density, or a worn drum unit leaving faint, repeating patterns on the page.
Check the toner gauge and don’t ignore a “replace toner soon” warning. Once a cartridge hits end of life, output degrades fast and unevenly, patchy in some areas, fine in others.
Look for “continue mode” or similar override settings. Some laser printers let you keep printing past the point where the cartridge should have been replaced. It sounds convenient, but continuing to print in this mode makes output progressively worse, and it can also mean you’re troubleshooting a fading problem that’s really just “the toner ran out three days ago and the printer kept going anyway.”
Check for toner-save or economy print modes in the driver. These deliberately lay down less toner to stretch cartridge life, and they’re easy to leave switched on after a one-off draft print job. Turn it off and increase print density if there’s a manual slider for it.
Look for repeating faded bands or ghosting at regular intervals down the page. If the same light patch reappears every few centimetres, that’s a strong sign of a worn drum or transfer roller rather than a toner issue. No amount of shaking the cartridge fixes that.
Replace toner or drum units with genuine equivalents when the fault points there. Compatible and refilled units can work fine, but they’re also a common source of inconsistent density, which is worth knowing before you assume the printer itself is failing.
Stopping printing the moment a replace-toner alert appears, rather than pushing through in continue mode, is the cheapest way to avoid a fading problem in the first place on most consumer laser machines.
Why is a new or refilled cartridge printing faint?
A brand new cartridge that prints faintly or isn’t recognised at all is one of the most frustrating faults, because it feels like it should just work. Nine times out of ten, the cause is embarrassingly simple.
Check for protective tape or plastic film over the nozzle strip or contacts. This is genuinely the most common cause of a new cartridge failing to print properly or being rejected outright by the printer. It’s easy to miss because the tape is often thin and the same colour as the cartridge housing.
Clean the copper contacts on both the cartridge and the carriage. Use a dry, lint-free cloth and wipe gently. Don’t use anything wet on the contacts themselves, moisture on electrical contacts causes more problems than it solves.
Let everything dry fully before reinstalling if you did use any liquid nearby. Even a small amount of residual moisture on contacts can cause intermittent recognition faults that look like a faded print problem but are really a connection problem.
Check whether the issue started right after a firmware update. Some printer manufacturers push firmware updates that change how the machine detects third-party or refilled cartridges, sometimes flagging genuine cartridges as errors. If your fading or “cartridge not recognised” message appeared right after an update, check the manufacturer’s support page for known issues before assuming the cartridge itself failed.
Test the cartridge in a different compatible printer if you have access to one. This is the cleanest way to isolate whether the fault is the cartridge or the printer. If it prints fine elsewhere, the carriage contacts or sensor in your printer are the problem.
If you’ve tried genuine cartridges from more than one batch and they’re all being rejected or printing faintly, the fault is very likely in the printer’s carriage contact assembly rather than the cartridges. At that point, repair costs can genuinely exceed what a budget printer is worth, which is worth knowing before you sink more money into cartridges that were never going to be the problem.
Could your print settings be the real problem?
Before you blame the hardware at all, it’s worth ruling out something that takes thirty seconds to check and fixes a surprising number of “faded printing” complaints: the driver settings themselves.
Open the print dialogue and check you’re not in draft or economy mode. Most software defaults to standard or best quality, but draft mode can get switched on accidentally, particularly on shared office or family printers where several people use the same settings.
Confirm the media type matches your actual paper. Selecting “plain paper” when you’ve loaded glossy photo stock, or vice versa, changes how much ink or toner the printer lays down and how it’s applied. This mismatch alone causes a lot of unnecessary panic about “broken” printers.
Reset or reinstall the driver if quality issues appeared after a Windows or macOS update. Occasionally an update resets colour profiles or introduces a bug, and a clean driver reinstall clears it. Microsoft’s printer troubleshooting documentation flags settings and driver mismatches as a leading cause of quality complaints, right alongside consumables and clogged nozzles.
Print the same test document at “best” quality with the correct media type selected. If it comes out crisp, you’ve found your answer and it cost you nothing.
Pro Tip: If quality problems started right after installing a printer or system update, check the driver settings before anything else. Updates sometimes reset your saved preferences back to a generic default, quietly switching you back to draft mode without any obvious warning.
How to safely clean a printhead by hand
Manual cleaning is the last DIY step before you’re into replacement or professional repair territory, and it’s also where people most often make things worse rather than better. A careful approach here matters.
What you actually need: distilled water (not tap water, which contains minerals that leave residue), lint-free cloths or paper (coffee filters work well in a pinch), and a clean, flat, well-lit workspace. Skip anything harsher unless the manufacturer’s own guide specifically recommends it.
Power off the printer and remove the cartridge or printhead assembly following your model’s specific release mechanism.
Fill a shallow container with warm distilled water, just enough to submerge the nozzle plate without covering the electrical contacts.
Soak for 15 to 30 minutes. This gives dried ink time to soften without oversoaking the components.
Blot the nozzle plate gently with lint-free paper. Don’t rub or scrub, that can damage the delicate nozzle openings.
Air dry for a minimum of two hours before reinstalling. Rushing this step is the single biggest mistake people make: residual moisture near the contacts can short the cartridge electronics or cause streaking that looks like an entirely new fault.
Reinstall, then print a fresh check page to confirm the fix worked before you use the printer for anything important.
Pro Tip: Never use alcohol-based cleaners near the cartridge’s electrical contact chip. It’s fine on some external plastic housing, but alcohol can damage the chip’s protective coating on certain cartridge models, turning a cleaning job into a cartridge replacement.
A few things should make you stop immediately and call a technician instead of continuing: any burning smell from the printer, a carriage that grinds or jams instead of moving smoothly, error codes referencing the carriage motor, or fading that persists across multiple genuine cartridges after you’ve already ruled out settings and cleaning. None of those are DIY territory, and pushing on risks turning a repairable fault into a write-off.
Simple habits that stop fading before it starts
A handful of small habits do more to prevent faded printing than any amount of after-the-fact troubleshooting.
Print a short test page weekly on any printer that doesn’t get used often. Nozzles dry out and clog on machines left idle for weeks, and a quick weekly print is far cheaper than a stuck printhead later.
Store unopened cartridges in their original sealed packaging, in a cool, dry spot away from direct sunlight.
Use paper rated for your printer type, glossy or matte stock designed for inkjets behaves very differently in a laser machine, and mismatched paper contributes to patchy or faded output.
Keep drivers reasonably current, but hold off on automatic firmware updates if you’re running third-party or refilled cartridges, since some updates change how the printer detects non-genuine consumables.
When it’s time to call a technician instead of DIY
Most faded print problems fall into two clear buckets. Low ink, a clogged nozzle, a stray toner-save setting, or tape left on a new cartridge, these are all things you can fix yourself in under half an hour. Cracked nozzle plates, a worn drum unit, a fuser fault, or a carriage motor throwing error codes are a different story entirely. No amount of cleaning cycles or manual soaking repairs physical damage.
If you’ve worked through the checks in this guide and the fading hasn’t budged, or you’re hearing grinding noises or smelling anything burning, stop there. That’s where an in-home printer repair visit earns its keep, a technician can pinpoint in minutes what might take you an afternoon of guesswork, and confirm whether you’re looking at a cheap fix or a printer that’s reached the end of its useful life.
A proper visit should include a full diagnostic check, a clear explanation of what’s actually wrong in plain language, and an honest call on whether repair or replacement makes more financial sense. That’s the standard worth expecting before you agree to pay for anything.
— Matthew
Get your printer sorted without the guesswork
If you’ve worked through the checks above and your printer is still spitting out faded, patchy, or streaky pages, professional technicians can come to you, diagnose the actual fault on the spot, and explain it in plain English, no jargon, no upselling you on a new printer you don’t need.

A typical first visit for printer issues covers a full print quality check, inspection of cartridges and contacts, a check of your driver and paper settings, and cleaning or replacement of worn parts where needed. And because Nextgenit works on a “No Fix, No Fee” basis, you’re only paying when the problem is actually solved. If you’re in Brisbane, Logan, Ipswich, or Redlands, you can book an in-home printer repair directly through our printer and scanner support page and get it fixed properly the first time.
Sources
Every printer model handles its diagnostic and cleaning menus slightly differently, so it’s worth checking your manufacturer’s own support page before attempting the more advanced steps above.
FAQ
Why is my printer printing faded when the ink is full?
Full ink doesn’t rule out clogged nozzles, a toner-save or draft setting left switched on, or a media type mismatch in the driver. Run a print quality check first, since a full cartridge with a blocked nozzle path produces exactly this symptom, as manufacturer diagnostics confirm.
How do I fix a faded printer?
Start with the cheapest fix first: check consumable levels, run a nozzle or print quality check, and confirm your driver isn’t set to draft or economy mode. If the diagnostic page shows gaps or missing lines, run one cleaning cycle and recheck before trying anything more invasive like a manual printhead soak.
Why is my print coming out dull?
Dull or washed-out colour usually points to a density or toner-save setting reducing how much ink or toner is applied, or to a paper type mismatch in the driver. On laser printers, dull output can also mean the toner cartridge is nearing end of life, particularly if you’ve ignored a replace-toner warning.
Can a faded print be restored?
The faded page itself can’t be reprinted darker after the fact, but the underlying cause is usually fixable. A cleaning cycle, a fresh genuine cartridge, or a corrected driver setting typically restores full-density printing on the next job, and if none of those work, a technician can usually pinpoint whether the printhead or drum needs replacing.
Recommended
Comments